I have been asked about door handing SO MANY TIMES over the years…hopefully with your help we can address the questions once and for all. Leave me a comment if I forgot anything!
The hand of the door opening can impact the preparation of the door and frame for hardware (ie. function holes on the wrong side of the door), installation of the hardware with the key cylinder on the correct side of the door, and helping to ensure that the correct doors and hardware are delivered to the jobsite. When I started my first job as a door and hardware detailer, I thought the proper way to hand a door was to use the “butt-to-the-butts” method, where you stand with your back against the hinge jamb and the direction the door swings determines the door hand. While this method is often used for residential doors and works for some commercial products and situations, it doesn’t apply all the time.
When I’m walking someone through the process of handing a door, here are the steps I use:
- Stand on the secure side (AKA outside or “key side”) of the door and face the door – or imagine yourself doing so. I define the secure side as the side where you would insert your key (this is different from the “secured side,” addressed here). If the door has a passage set, imagine where the secure side would be if the door had a lock.
- While facing the door on the secure side, take note of the hinges. Are they on your right or your left?
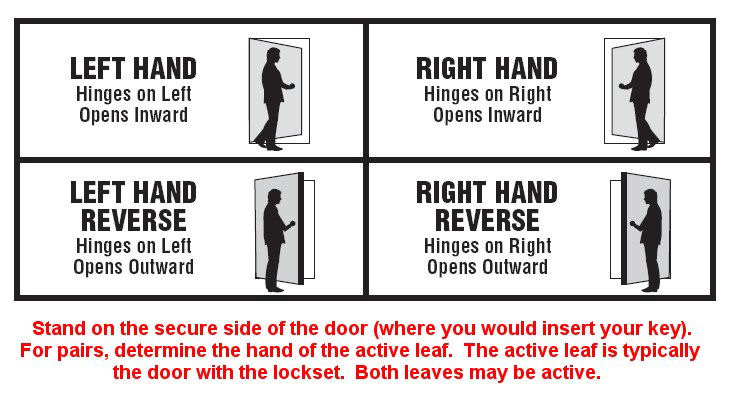
- If the door swings away from you, it will be a left hand (LH – hinges on the left) or a right hand (RH – hinges on the right). If the door swings out toward you, it will be a left hand reverse (LHR – hinges on the left) or a right hand reverse (RHR – hinges on the right).
A few things to note:
- For pairs of doors, you are handing the active leaf, which is the leaf with the lockset – the inactive leaf may have flush bolts. For doors with panic hardware, the active leaf may have a key cylinder on the pull side and the inactive leaf may be “exit only” with no cylinder on the pull side. A pair with push/pull hardware or the same panic hardware on both leaves may be called “both active.” Pairs where you can identify the active and inactive leaves will be left hand active (LHA), right hand active (RHA), left hand reverse active (LHRA) or right hand reverse active (RHRA). Most pairs are either right hand active (RHA) or right hand reverse active (RHRA) because of traffic flow.
- Double-egress pairs have one leaf that swings toward you and one that swings away. These are typically RH/RH – both leaves right hand, although on occasion I have seen LH/LH double-egress pairs. When panic hardware is used, RH/RH double-egress pairs are called LHR/LHR.
- Panic hardware and fire exit hardware (panic hardware that is listed for use on fire doors) will always be left hand reverse (LHR) or right hand reverse (RHR) because doors with panic hardware are always outswinging.
- Door closers are always left hand (LH) or right hand (RH) because they are not affected by the door swing. One exception would be double-acting closers, which are not handed.
- Some products are non-handed or can be handed in the field. For example, a door that will have a cylindrical lockset will be the same if it is a left hand or right hand reverse, and the same if it is a right hand or left hand reverse, because the preparation for the lockset is the same on both sides of the door. The exception to this is if the door has a glass kit or the frame has a sidelite. When there is glazing, the screws will typically be on the inside.
- “Tos and froms” cause a fair share of confusion. These are found on door and hardware submittals – for example, “exterior from lobby” or “corridor to classroom”. The to or from designation refers to the direction of the door swing – the door is swinging from the lobby to the exterior, or to the classroom from the corridor. Doors that are LH or RH will be “to” and doors that are LHR or RHR will be “from.
Here’s a cheat sheet to help with handing:
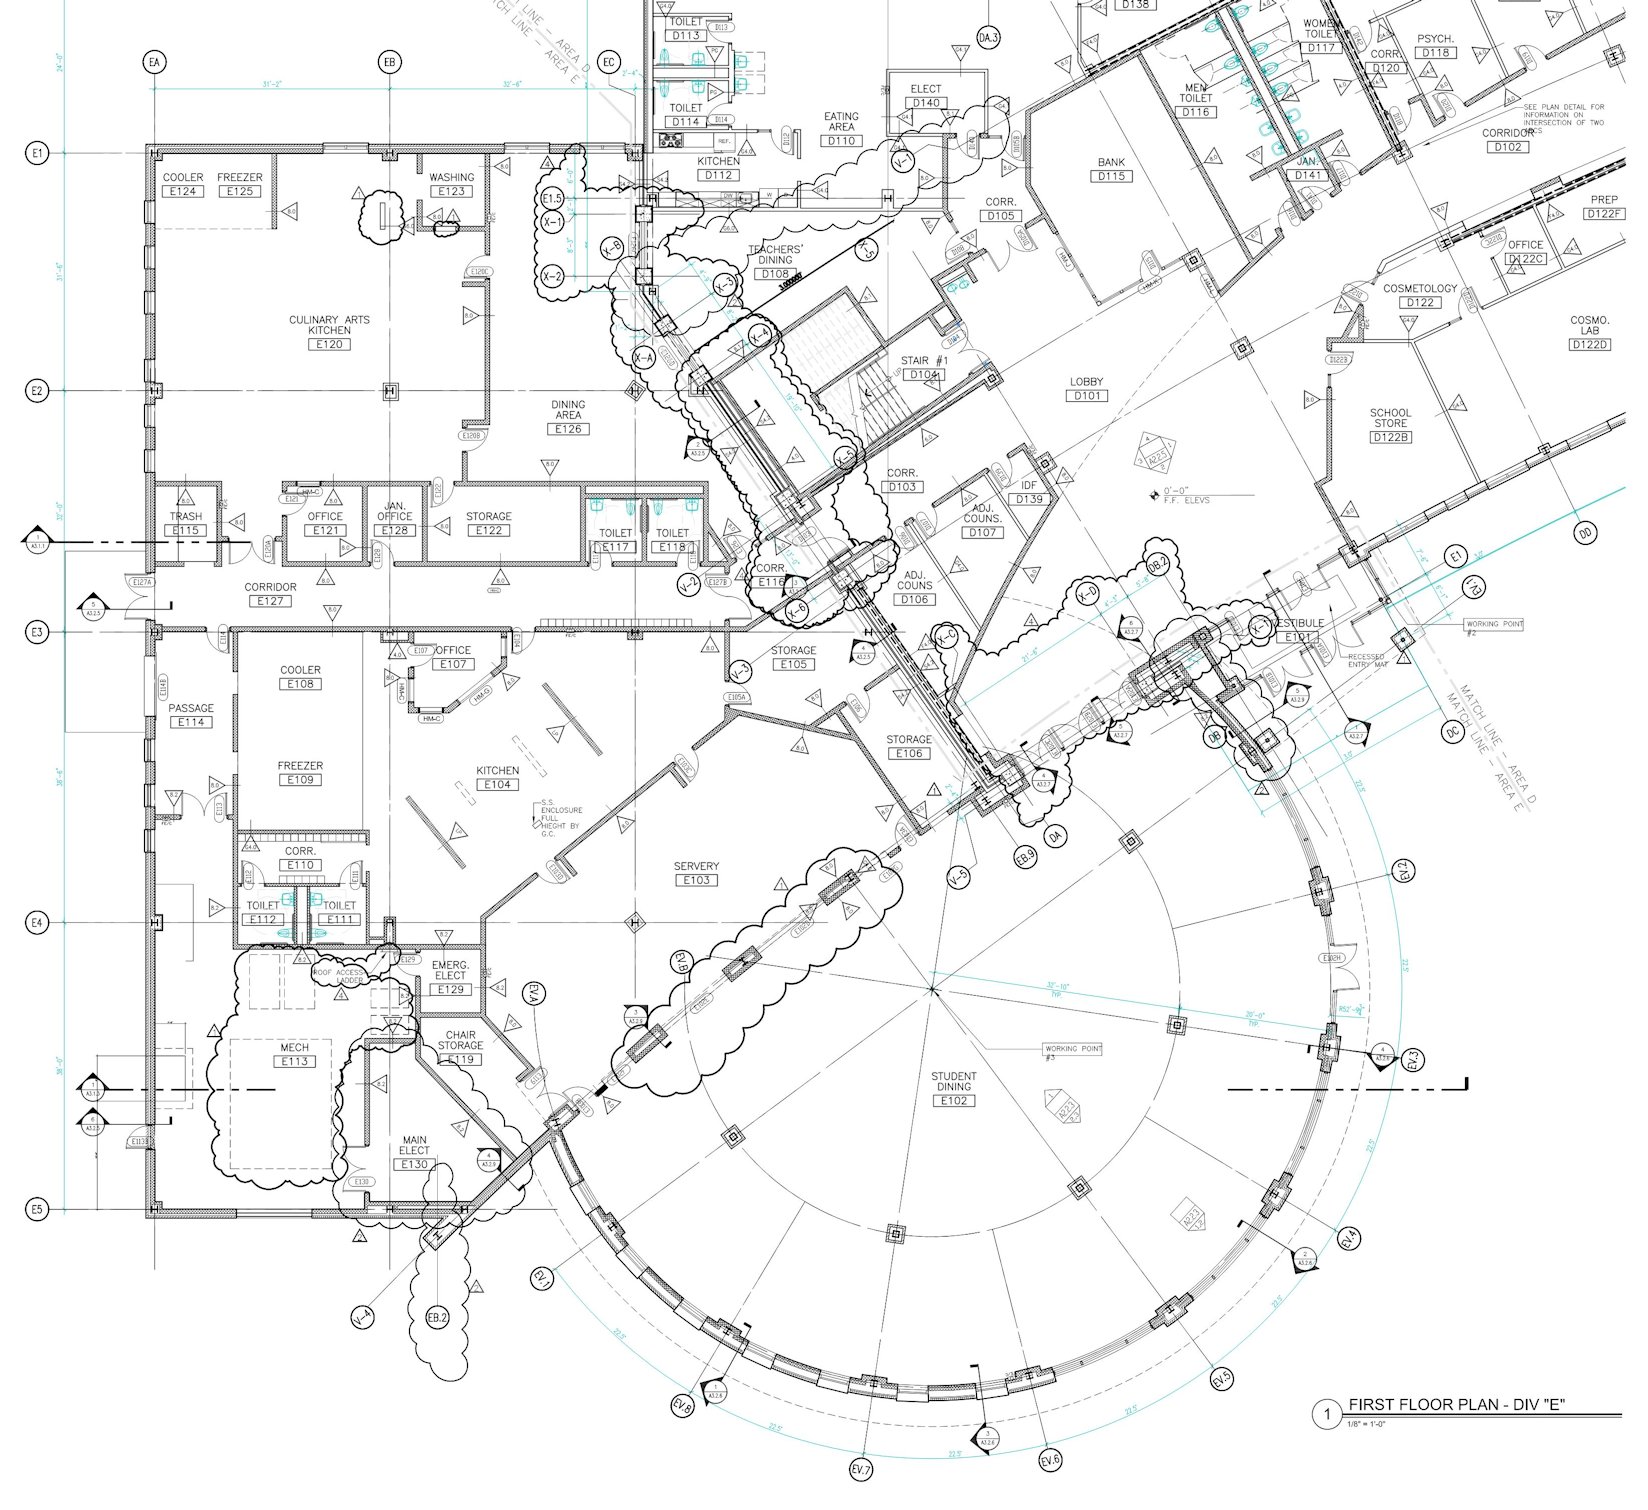
And a practice exercise (click image to enlarge or download the plan here):
Here are my tos and froms for some of the doors on this plan…do you agree?
- D103 – Corridor D103 – Corridor E116 – RH/RH (or LHR/LHR if panic hardware or fire exit hardware is used)
- D104 – Lobby D101 from Stair D104 – RHRA
- D115 – Lobby D101 to Bank D115 – RH
- D122 – Corridor D102 from Cosmetology D122 – RHR
- D122B – Lobby D101 to School Store D122B – LH
- E101A – Exterior from Vestibule E101 – RHRA
- E101C (assuming push/pull hardware) – Vestibule E101 from Lobby D101 – Both Active
- E103A – Student Dining E102 to Servery E103 – RH
- E111 – Corridor E110 from Toilet E111 – LHR
- E120B – Dining Area E126 from Culinary Arts Kitchen E120 – RHR
Thank you to DRA Architects for allowing the use of this floor plan for educational purposes.
You need to login or register to bookmark/favorite this content.


Good article. Flush it out, and send to DHI for them to make a article of to send to everyone in the industry. And, then you have to realize that those people who are involved in residential industry, use the terms inswing and outswing which are really confusing. They need to learn our terminology to order commercial products.
I can’t believe the number of times when I’m checking a door or hardware submittal that these are wrong – which means some of the hardware is being ordered incorrectly. I always breakout my cheat sheet just to relearn it each time. Just to note LH and RH are “TO” and LHR and RHR are “FROM” Right?
Exactly!!
That’s correct.
“””Panic hardware and fire exit hardware (panic hardware used on fire doors) “””
Fire exit hardware on rated doors
I will clarify…what I meant was that fire exit hardware is panic hardware to be used on fire doors.
Under “A Few Things to Note”, Orange Dot number 5, a door with a window will usually have a fixed glass stop and a removable stop. Sometimes a LH door will not be the same as a RHRB door, or a RH the same as a LHRB when there is a window in the door. The fixed stop is normally on the secure side of the door, making a regular bevel door different from a reverse bevel door, even with the cylindrical lock prep.
Good point!
Remember when architects included door handing on the door schedule? In fact hand lettering door schedules was a typical fresh out of architecture school task for a young graduate. It may have even been covered on the registration exams. Now most architects don’t have a clue.
I ran out of those Steelcraft door handing cards about the time of the spin off. Are you reprinting them with the Allegion logo now? If so, bring one with you when you come to Baltimore – I’d like to have one for old times sake. I’ll stop by the booth and pick it up.
By the way, congratulations on the Specifier award for your article. Well deserved.
Thanks George! I’ll ask Melany if we are reprinting those cards. I haven’t seen one for years.
For the door closer, there is a double acting door closer which means non-handed such as LCN 6030 series.
Thanks! I edited the post to reflect this.
Lori, thanks so much for this article. No matter how long I have been an architect I have to keep refreshing myself on door handing.
You’re welcome!
Thank you. I’m just starting out and I read all of your articles. I even save most of them. I like to print them out and give them to people in the office.
Thanks Kathy!
Lori, just a reminder TO says it is RH or LH FROM says RHR OR LHR
Thanks for the article
Dan
another useful tip to remember with door handing and door closer handing (I may have said this one in past here on IDH)
if you mount it on a corner bracket (such as potbelly closers) the closer’s hand is opposite the door’s
example LH door, closer will have to be set to RH swing
RH door, set closer to LH swing
as for the butt-to-the-butts method, that is true for closer specifying, as a closer on a RHR will be installed (and templated) as a LH install. reverse for LHR so in a way, “butt-to-the-butts” makes sense to me and has a place in finding out the hand of your door.
-Jess the door closer doctor
Hi Lori,
Wonderful article, though in European standards we are following different method. ISO method for handing. Worse to note that the handing of architectural ironmongery is different than door handing. Regards
Another standard in Europe EN 12519
Thanks Lori. I always enjoy (and bookmark) your back to basics articles.
I have a slightly different self-visualization trick. I picture my arm is the door and my shoulder is the hinge. So if the door pushes away from me and my RIGHT hand moves out = RH. If I have to back up because the door is swinging towards me, then i have to go in REVERSE = RHR.
I was taught way too many years ago the “Butt to Butt” method. With your butt against the butt hinges, if the door swings into the room on your left side it’s a LH door. If it swings into the room on your right side it’s a RH door. If it swings out of the room on your left side it’s a RHR door. If it swings out of the room on your right side it’s a LHR door. “Into the room” and “out of the room” depends on where the key is.
That is correct, Ross. Some people use the butt-to-butt method but only consider the LH & RH swings, which can result in incorrectly prepped doors.
– Lori
Please define LHRB & RHRB – I have everything except that B at the end. Thank you.
Hi Cecelia –
The “B” means “bevel”…so LHRB = left hand reverse bevel. It’s the same thing as left hand reverse.
– Lori
[…] Choosing the right door handing is crucial. You need to know if it’s left-hand (LH), right-hand (RH), left-hand reverse (LHR), or right-hand reverse (RHR) to order the right hinges12. […]
[…] Choosing the right door handing is crucial. You need to know if it’s left-hand (LH), right-hand (RH), left-hand reverse (LHR), or right-hand reverse (RHR) to order the right hinges12. […]